

Let end users sign up for your agent
By default, only users you create by hand under Users can sign in to one of your agents. Self-registration flips that: visitors land on the agent’s login page, click “Continue with Google” (or sign up with email + password), verify their email, and walk straight into the agent.
Surogate doesn’t run the sign-up system itself. You bring your own Firebase Authentication project, point Surogate at it, and Firebase handles passwords, OAuth handshakes, password resets, and verification emails. Your end users’ credentials live in your Firebase project — Surogate never sees them.
You only need to set this up once per project. After that, every agent in the project can be opted in or out individually.
Who can use it
Section titled “Who can use it”Self-registration is available on the Standard plan and above. Projects on the Free plan see the configuration screen but can’t edit it — there’s an inline upgrade prompt on the Authentication tab.
You need to be the project owner to configure Firebase. Editors and viewers can see whether self-registration is on for an agent but can’t change the project-level Firebase settings.
The big picture
Section titled “The big picture”Three things to get right, in order:
- Create a Firebase project in the Firebase Console and write down a handful of public config values.
- Paste those values into Surogate under Settings → Authentication tab → BYO Firebase auth. Pick which sign-in methods you want offered (Google, GitHub, Email/Password).
- Flip the toggle on each agent under Publish → Users tab → Let anyone sign up. Restart the agent so the new config is picked up by its web app.
Step 1 — Create a Firebase project
Section titled “Step 1 — Create a Firebase project”-
Sign in to the Firebase Console.
-
Click Create a new Firebase project and pick a name that reflects the audience for your agents (e.g.
acme-agents). -
Enable or disable Gemini / Google Analytics — your call. Neither affects self-registration.
-
Once the project is created, click the gear icon → Project settings → scroll to Your apps → click the
</>Web button. -
Give the web app a nickname, skip the Firebase Hosting offer, and register. Firebase shows you a config snippet that looks like this:
const firebaseConfig = {apiKey: "AIza...",authDomain: "acme-agents.firebaseapp.com",projectId: "acme-agents",appId: "1:1234567890:web:abcdef...",messagingSenderId: "1234567890"};Leave this tab open — you’ll copy these values in the next step.
Step 2 — Tell Surogate about your Firebase project
Section titled “Step 2 — Tell Surogate about your Firebase project”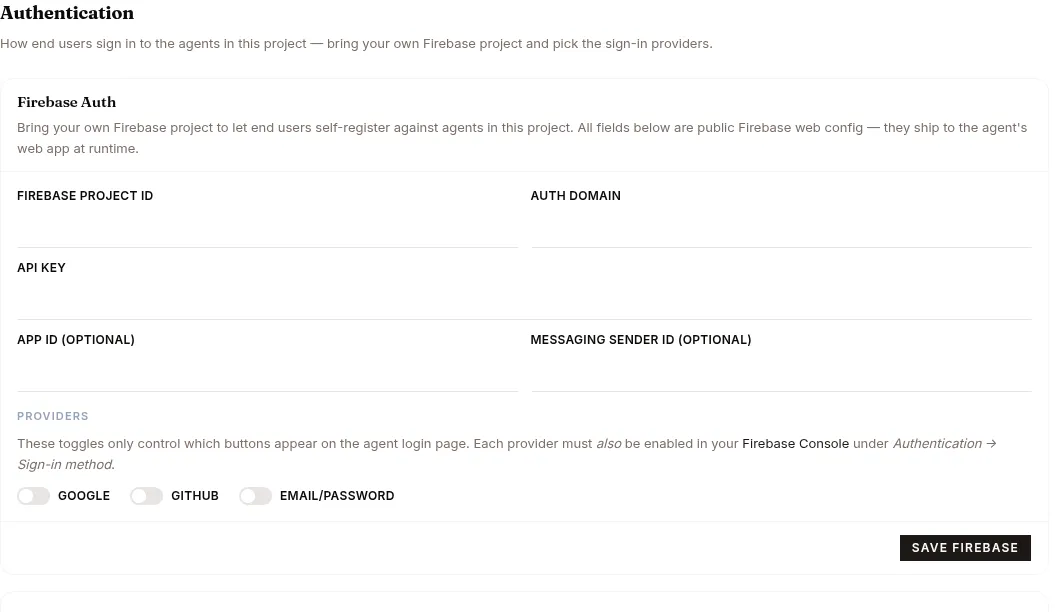
-
Open Settings → Authentication tab → BYO Firebase auth (the card sits on the Authentication tab; if it’s missing you’re on the Free plan — upgrade first).
-
Fill in:
Surogate field Firebase value Firebase project ID projectIdAuth domain authDomainAPI key apiKeyApp ID (optional) appIdMessaging sender ID (optional) messagingSenderId -
Click Save Firebase. A green configured badge appears once the values stick.
The card stays editable — change a value and click Save Firebase again any time. Click Remove Firebase to disconnect (existing self-registered users keep their database rows but can no longer sign in until you re-add the config or issue them local credentials).
Step 3 — Choose sign-in methods
Section titled “Step 3 — Choose sign-in methods”Firebase has dozens of sign-in providers. Surogate surfaces three:
| Provider | What your user does | What you need to do |
|---|---|---|
| Clicks “Continue with Google”, picks an account, done. | Nothing on the GitHub side — just enable Google in the Firebase Console. | |
| GitHub | Clicks “Continue with GitHub”, authorizes the OAuth app, done. | Register a GitHub OAuth App and paste its Client ID + Secret into Firebase. See Wiring GitHub below. |
| Email/Password | Types email + password into the existing login form. | Toggle it on in the Firebase Console. Firebase manages the passwords. |
Toggle the providers you want on the Authentication tab’s Providers row.
Wiring GitHub (optional)
Section titled “Wiring GitHub (optional)”- Go to github.com/settings/developers → New OAuth App.
- Fill in:
- Application name — what your users will see on the GitHub consent screen (e.g. Acme Agents).
- Homepage URL — your agent’s URL.
- Authorization callback URL — Firebase shows this when you enable the GitHub provider; it looks like
https://<your-auth-domain>/__/auth/handler.
- Hit Register application, then copy the Client ID + generate a Client secret.
- Back in Firebase Console → Authentication → Sign-in method → GitHub → paste the Client ID and Secret → Save.
- Flip the GitHub switch on in Surogate.
Step 4 — Authorize your agents’ domains
Section titled “Step 4 — Authorize your agents’ domains”Firebase only lets sign-ins happen from domains it knows about. By default it allows localhost and your Firebase project’s own *.firebaseapp.com domain, which is enough for the Console preview but not for your real agent.
- Firebase Console → Authentication → Settings → Authorized domains.
- Add the public hostname where your agent’s web app is served (e.g.
support.acme.comoragent-smith.cloud.surogate.ai).
Skip this step and your users will see “This domain is not authorized.” the moment they click any sign-in button.
Step 5 — Turn the switch on for an agent
Section titled “Step 5 — Turn the switch on for an agent”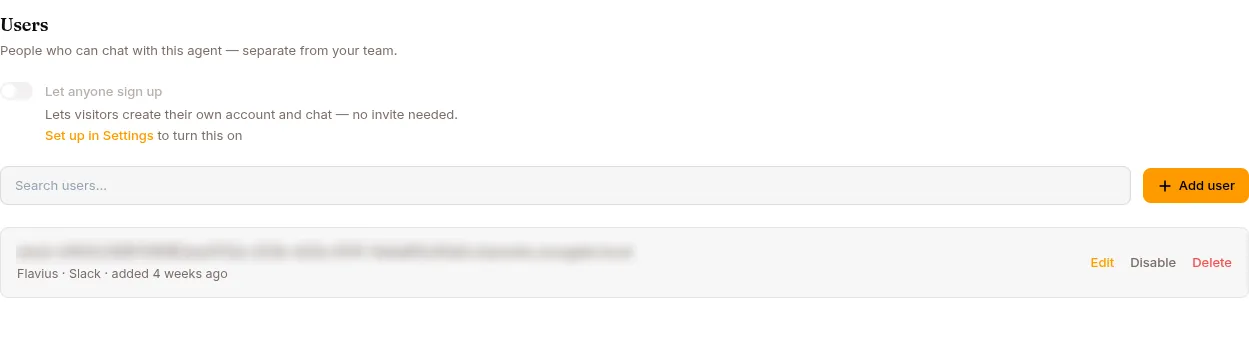
- Open the agent you want self-registration enabled for.
- Publish in the left nav → Users tab.
- Flip Let anyone sign up.
The switch is disabled until your project has a Firebase config saved. When it’s disabled you’ll see a small Set up in Settings link next to it — click to jump straight to Settings → Authentication.
Restart (or stop + start) the agent. Self-registration is picked up at deploy time, so the toggle won’t take effect on the live web app until the agent restarts.
What end users see
Section titled “What end users see”When self-registration is on, the agent login page shows:
- The familiar email + password form, with a Sign in button.
- Buttons for any social providers you enabled (Google, GitHub).
- A small “New here? Create an account” link below the form if you enabled Email/Password.
A first-time user can either click a social provider (one-tap, no password) or switch into create-account mode, type an email and password, and hit Create account.
Email verification
Section titled “Email verification”When a user creates an account with Email/Password, Firebase sends them a verification email. Until they click the link in that email they can’t sign in — the login page shows “Check your inbox (and spam folder) for a verification email, then sign in again.” with a Resend verification email button next to it.
Once they verify, they sign in normally and land in the agent. Social sign-ins (Google, GitHub) are pre-verified by the provider, so those users skip the verification step entirely.
After sign-in: what they can change
Section titled “After sign-in: what they can change”Signed-in users manage their account under the agent app’s Settings → Profile — display name is editable, the sign-in email is not. Password controls follow the sign-in method (Surogate records it server-side, so the right control shows even after the SSO session lapses):
- Email/password users get a Send reset email button (the confirmation toast is deliberately neutral — it never reveals whether an address is registered).
- Google / GitHub users see no password UI — their provider owns the credential. If such a user reports “I can’t change my password”, that’s why.
- Accounts you created manually on the Users tab get an in-app change-password form instead.
See Web for the full Settings page.
Manual users still work
Section titled “Manual users still work”If you’ve created users by hand under Users, they keep signing in with their local password as before. Self-registration adds options on top — it doesn’t replace anything.
Troubleshooting
Section titled “Troubleshooting”Verification emails go to spam
Section titled “Verification emails go to spam”Firebase sends from noreply@<your-project>.firebaseapp.com, a shared sender domain. Gmail and Outlook routinely flag it.
Fix it for good in the Firebase Console:
- Authentication → Settings → Public-facing name — set this to a real name (e.g. Acme Agents).
- Authentication → Templates → Email address verification → ✏️ → Customize domain — verify a subdomain you own (e.g.
auth.acme.com). Firebase walks you through the DNS records to add.
After verification, the from-address becomes [email protected] signed with DKIM aligned to your domain — and emails land in the inbox, not spam.
For a fully custom email pipeline, set up an SMTP sender like SendGrid, Postmark, AWS SES, or Mailgun, and point Firebase at it under Authentication → Templates → SMTP settings.
“Continue with Google” fails with auth/operation-not-allowed
Section titled ““Continue with Google” fails with auth/operation-not-allowed”You enabled the Google toggle in Surogate but not in the Firebase Console. Open Authentication → Sign-in method → Google in the Firebase Console, flip Enable, set a project support email, save. The Surogate toggle just controls whether the button appears; Firebase still needs to know the provider is allowed.
“This domain is not authorized”
Section titled ““This domain is not authorized””The hostname your agent’s web app runs on isn’t in Firebase’s authorized-domains list. Add it under Authentication → Settings → Authorized domains.
The toggle stays disabled even though I configured Firebase
Section titled “The toggle stays disabled even though I configured Firebase”Three things to check, in order:
- You’re on the Free plan. Self-registration requires Standard or above — the Authentication tab shows an upgrade banner. Upgrade and the toggle becomes editable.
- You’re not the project owner. Editors and viewers can see the toggle but can’t flip it. Ask the project owner.
- You configured Firebase but didn’t save it. Re-open Settings → Authentication tab → BYO Firebase auth and confirm the green configured badge is showing. If not, click Save Firebase.
Self-registered users were locked out after I removed Firebase
Section titled “Self-registered users were locked out after I removed Firebase”Removing the project’s Firebase config also disables Firebase login. Their database row still exists — go to Publish → Users tab → + ADD USER and re-issue local credentials by entering the same email, or restore the Firebase config.
A user complains they never got the verification email
Section titled “A user complains they never got the verification email”On the login page, switch to create-account mode (you might already be seeing the notice from a recent attempt), then click Resend verification email. If that returns “Too many attempts. Please wait a moment and try again.” — Firebase rate-limited; wait a few minutes.
Also worth telling them to check the spam folder, especially before you’ve set up a custom auth domain (see above).
Removing self-registration later
Section titled “Removing self-registration later”Two scopes:
- Stop offering it on one specific agent — flip Let anyone sign up off on the agent’s Publish → Users tab and restart the agent. People who already signed up for that agent keep working; only new sign-ups are blocked.
- Stop offering it across the whole project — click Remove Firebase on the Settings page. Every agent in the project goes back to admin-only login, and previously self-registered users can no longer authenticate via Firebase until you restore the config (their rows are preserved; you can issue them local credentials in the meantime).
The Firebase project itself is yours — Surogate doesn’t touch it. Deleting your Firebase project deletes all your users; the same applies if you cancel Firebase billing.
A word on security
Section titled “A word on security”- The Firebase web config you paste into Surogate is public client config, by design. Anyone who inspects your agent’s web app can see it. Real protection comes from:
- Firebase Authorized Domains restricting where sign-ins can happen
- Provider-level OAuth client secrets that never leave Firebase
- Surogate’s own server-side check of every Firebase ID token before creating a session
- Email verification is required for any new email/password account. Surogate refuses to log in unverified users so a typo in the email field can’t grant access to a stranger’s inbox.
- Manually-created users are isolated from Firebase users, even when their emails match. Creating a manual user whose email is already linked to a Firebase account requires an explicit override so admins don’t accidentally shadow a real signed-up user.
What’s next
Section titled “What’s next”If you want to charge those self-registered users for using the agent, see Monetize your agents. Otherwise loop back to Improve your agent.