

Templates
The Templates page is where you start a new agent — either from a pre-built template or from scratch.
Open it at /work/templates. The page header reads “Templates — Start from a pre-built agent.” A Dashboard link returns you to /work.
Layout
Section titled “Layout”- Prompt hero — a box to describe what you want the agent to do, plus quick-start chips (one per category, drawn from the real template registry).
- Best matches — after you submit a prompt, the top templates that fit appear here.
- Browse all templates — a search box, category filter chips (each showing its count), and a grid of every template.
Each template card shows the template’s name, its category badge, a description, and the skills it ships with (hover a skill chip to see its trigger text).
Finding a template by describing the work
Section titled “Finding a template by describing the work”- In the prompt hero, type what you want the agent to do (or click a quick-start chip).
- Press Enter / submit. The page runs a match and shows Best matches based on your prompt — a count of templates that fit, as cards.
- Use one of the matches, or scroll down and keep browsing.
You can also open the page pre-filled by arriving with a ?q=… query — it auto-submits that prompt on load.
Browsing and filtering
Section titled “Browsing and filtering”- Type in the Search templates… box to filter by name, description, or category.
- Click a category chip (e.g. All n, or a named category with its count) to filter the grid.
- The footer notes the totals: “n templates · m categories.”
Using a template
Section titled “Using a template”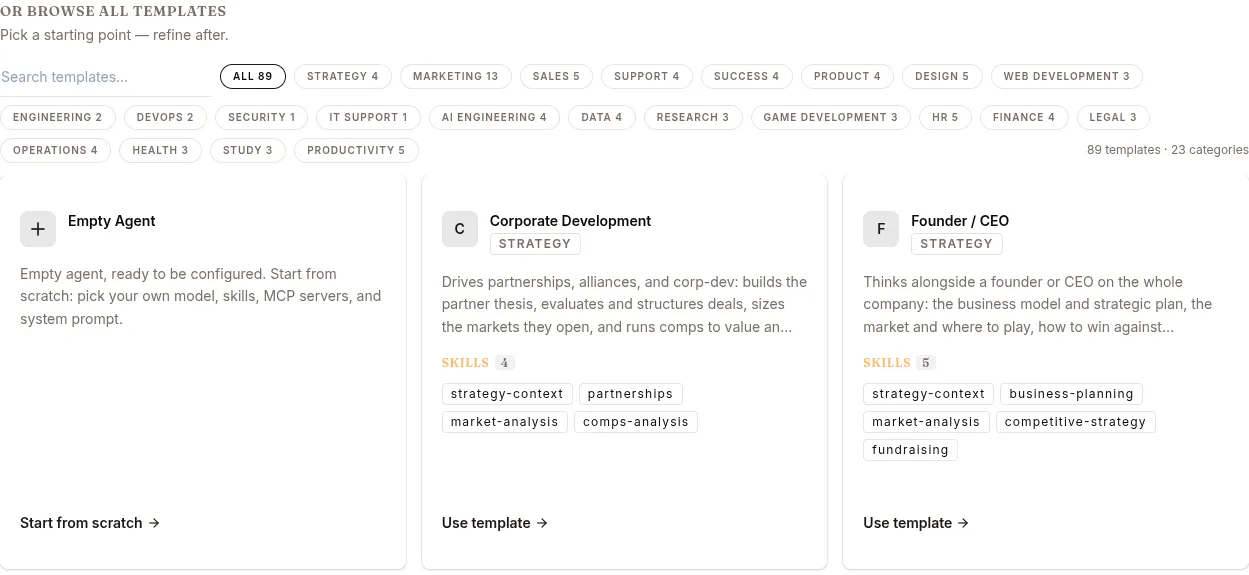
- Click a template card to open its preview dialog.
- In the preview, click Use (also available directly on the card).
- The agent is created in your active project with the template’s skills attached. You’ll see a confirmation like “Template name created with its skills attached,” and you’re taken to the new agent.
You must have an active project selected first; otherwise the page asks you to “Pick a project before creating an agent.” Creating an agent may be gated by your plan, in which case an upgrade prompt appears.
Starting from scratch
Section titled “Starting from scratch”If no template fits, use the Empty agent card (shown when browsing all categories with no search filter). Clicking it opens the create-agent flow at /work/create-agent.
The create-agent flow
Section titled “The create-agent flow”The Create agent page (“Name it and describe what it does — it’s live in ~30 seconds”) has these fields:
| Field | Required | Notes |
|---|---|---|
| Agent name | Yes | How it appears in your dashboard. |
| What does this agent do? | Yes | One or two sentences; shapes the agent’s persona and shows on its overview page. |
| URL slug | No | Defaults to a slug of the name, under cloud.surogate.ai/. Locked after creation; renaming later changes the public URL and breaks existing integrations. |
| Model | No | Defaults to Surogate; changeable later under Configure. |
Steps:
- Enter the Agent name and a description of what the agent does.
- Optionally adjust the URL slug (the server appends a unique suffix, so a name is never rejected as taken).
- Click Create agent. A progress indicator deploys the agent (about 30 seconds), then you land back on the dashboard with the new agent live.
New agents are created on the surogates harness. As with templates, you need an active project, and creation may hit a plan gate.